
Fiction-Food Café

October 29, 2013
Jiji Doubts Doonatsu (Animal Donut) | Kiki's Delivery Service
October 28, 2013
Pumm's Pumpkin Soup | The Legend of Zelda: Skyward Sword
.jpg)
Pumpkin Soup |
.png)
 Soup is a significant food in many of the "Legend of Zelda" games, acting as a restorative item (unless it's the nasty soup from "Twilight Princess") and either a main quest or side quest in the storyline of the game. In 2011's "Skyward Sword", Link finds a restaurant called The Lumpy Pumpkin on the floating island of Pumpkin Landing whose specialty is Pumm's Pumpkin Soup (the owner's name being Pumm--his daughter's being Kina. Ha). If Link breaks the chandelier in the establishment, one of the tasks he must do for reparation is deliver a bottle of this yummy soup within its 5 minute hot window. Another task involving the soup--a whole, huge, pumpkin cauldron of it--is to deliver it to a flying whale sky spirit who happens to have a gross infection (that Link must heal of course).
October 25, 2013
Vegetarian Momo (Dumplings) for "Avatar: The Last Airbender"
.jpg)
Today's "Avatar" food doesn't have a specific episode reference, but dumplings of various kinds have made their way into both ATLA and TLoK because of the heavy influence from Asian cultures. Dumplings is a food chosen initially from the Avatar Wikia's listing of Air Nomad food, and then solidified and expounded upon by the fact that the Air Nomad society takes much inspiration from the high altitude, spiritual culture of Tibet, where vegetarian momos (dumplings) are a common food. As you may recall, all Air Nomads, including Aang, were vegetarian because of their spiritual beliefs (as learned in ATLA s.1, ep.5).
Also, just FYI, the existence of momo dumplings is not why Aang's winged lemur is named Momo, though it is a pretty awesome coincidence. No, he's named Momo because he stole a moon peach from Sokka (ATLA s.1, ep.3), and "momo" is the Japanese word for peach.
Note: Below you'll find two momo filling recipes, one savory and one sweet. The sweet recipe is one I came up with based on the fact that Air Nomads often ate nuts and fruit and I thought Aang would appreciate something sweet. The ingredients are foods commonly used in Tibetan cooking. You'll also find below a few ways to cook momos such as steamed, fried, and in broth. There's also a tomato chutney/salsa recipe (tomato is commonly used with momos, but not necessarily in them). Also, you can totally add meat, but of course it will no longer be Air Nomad friendly. Simply substitute ground meat for the tofu and mushrooms in the savory recipe below (or, you know, keep the mushrooms).
Air Nomad Vegetarian Momos (Dumplings)
Ingredients:
Dough
.jpg) 4 Cups White All-Purpose Flour
4 Cups White All-Purpose Flour1 1/2 Cup (or more) Hot Water
1/4 tsp. Salt
Savory Filling
2 Cups Pre-Shredded Coleslaw Cabbage Mix, pref. w/ carrots (found in salad section of grocery store)
1/2 Onion, chopped
1 pkg. (abt. 3.2 oz) Shiitake Mushrooms
1/4 Cup Chopped Fresh Cilantro
6 oz. Tofu
1/2 tsp. Fresh Ginger, grated
1 tsp. Minced Garlic
1 Tbsp. Soy Sauce
1 Vegetable Bullion Cube dissolved in 1/4 Cup Hot Water
Ground Pepper, to taste
Sweet Filling
1 Cup Walnut Pieces
1/3 Cup Chopped Dates
1/3 Cup Raisins
6 oz. Tofu
1 Tbsp. Honey
Dash of Allspice OR Ground Cloves, Nutmeg, & Cinnamon, to taste
Tomato Chutney (optional)
5-6 Canned, Whole, Peeled Tomatoes
(or simply get a large can of these tomatoes & pull out however many you want to use)
1/4 Cup (or less) Chopped Cilantro
1 tsp. Minced Garlic
Chili Pepper or Red Pepper Paste OR deseeded hot peppers, to taste (optional)
Important Items:
Steamer or Rice Cooker with a steaming tray (if you want to steam the dumplings)
Food Processor or Blender (optional)
Rolling Pin
Circle Cutter or Large Cup
Directions:
1. In a large bowl combine the flour & salt. Pour in the hot water a little at a time, either kneading with your hands or with a dough hook attachment to a mixer (I used my stand mixer. I'm sure you could also use a bread machine). Keep adding water & mixing/kneading until you have an elastic dough that is no longer sticky (if you used a mixer, it's good to knead by hand for the last stretch to make sure it's the right consistency--like noodle dough & pizza dough). If the dough id too sticky, knead in a small amount of flour, if it's too dry, add water. You get the idea. The amounts of water to flour are general & depend on your climate. To keep the dough from drying out, put tit back in the bowl & cover it with a slightly damp towel or simply put the bowl upside down over the dough.
.jpg)
(If you'll be steaming your dumplings, set up your steamer now & get the water on its way to a boil. Remember to keep an eye on your steamer water level so it doesn't run out & you burn the bottom of your pot!)
3. Separate the dough into manageable sections, like thirds, keeping the dough you're not working with under the bowl or towel, & roll it out on a lightly floured board to about 1/8 in. thickness. Use a circle cutter or cup rim, about the width of your palm or a little greater, & cut as many circles as you can, re-rolling the dough & cutting until there's no dough left. As you make circles, stack them (they should not be sticky, remember?) & cover them with an upturned bowl or slightly damp towel. Repeat this with all of the dough sections until all you have are a bunch of dough circles.
.jpg)
Note: I made my dumplings round, but you can also make half moons by wetting the edges of the circle & then simply folding it in half & pleating/crimping the edges closed. I chose round so it would look more like the somewhat unique Tibetan momos.
.jpg)


.jpg)
Note: For the sweet momos (which are also served hot), a drizzling of honey on top is very nice.
.jpg)
.jpg)
.jpg)
.jpg)
October 21, 2013
Kuroneko Doubutsu Doonatsu (Animal Donut) | Trigun


 With Halloween right around the corner I thought it'd be fun to pair this doughnut animal concept with a black cat. But it's got to be a black cat from fiction so I thought what about Kuroneko (shown right), the little black cat in one of B's favorite anime series, "Trigun"? And then B reminded me that the main character Vash (shown above) looooves doughnuts, so it's perfect! Kuroneko-sama, literally (very respected) "Ms. Black Cat" in Japanese, is a random little black cat with huge eyes that appears in every episode of the "Trigun" anime series and sporadically in the manga (comics).
October 18, 2013
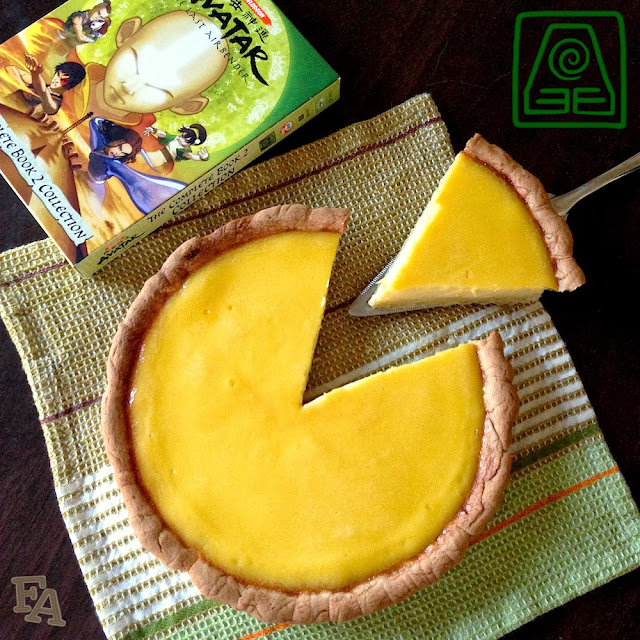
Egg Custard Tart from "Avatar: The Last Airbender"
.jpg)
(video from Ph03n!x)
Note: Using the recipe below you can also make small tarts in tartlet pans or a muffin tin, but be sure to adjust the baking times, as smaller portions will cook faster.
.jpg)
Earth Kingdom Egg Custard Tart
1 Uncooked Tart or Pie Crust (regular 9" size) OR Homemade Asian Tart Dough (recipe here)
3/4 Cup Water
1/3 Cup Sugar
4 Large Eggs
1/3 Cup Evaporated Milk
1/2 tsp. Clear Vanilla Extract (optional)
(If you use regular brown vanilla it will change the color of the custard.)
Important Items:
Fine Mesh Strainer
Directions:
1. Preheat oven to 350°F. Spray your pie pan with non-stick spray & smooth the tart or pie crust into the pan, doing your best to avoid trapping any air under the dough. And as you can see from the screen shot above, the tart is not fancily made, so no need to flute the crust edges. Bake on the middle oven rack for about 10 mins or so to solidify (pre-bake) the crust.


Tip: If you'd like to remove the tart from the pan once it's cooled down a little, put a large plate over the top & flip both the plate & the tart. Carefully remove the pie pan from the tart & then put another plate on the tart's upward-facing, exposed bottom. Invert the tart & plates so that the tart is right-side-up & remove the plate from the top. Serve warm or chilled. Tastes nice sprinkled with a little pumpkin pie spice or nutmeg.
.jpg)
October 14, 2013
Finn's Meatloaf | Adventure Time
.jpg)
Ice King: And Finn, your favorite food is meatloaf.
Finn: How did you--?
October 13, 2013
Pumpkin Pot de Crème Mix from Sof'ella + Harry Potter Giveaway!

 For a long while now I've been saving a little hardcover, UK 1st edition, of J. K. Rowling's Tales of Beedle the Bard to give away. And while perusing World Market recently I discovered several pumpkin items, including this pumpkin pot de crème mix (and it was on sale, tralala). So I thought let's combine these two and do a fun little Halloween-y giveaway (and there is a pot in the Tales besides) with a couple of other small items thrown in (owl cookie cutter & candy cauldron)! ((To be honest, I'd been saving this book along with a box of Bertie Bott's Every Flavor Beans, but apparently Jelly Belly's beans have expiration dates--printed on their boxes anyway. Oh well! I waited too long!)) I thought this Sof'ella mix would be perfect for a giveaway because all you need to add is milk (and provide your own whipped cream if you want it, recipe here).
 The consistency of this pot de crème is like custard and it tastes like you're eating pumpkin pie filling. It's really yummy, especially with whipped cream on top. And it's so easy to make! Just the package plus milk. easy peasy. It makes enough for 4 servings in regular size ramekins. Note: This pot (de crème) does not hop.
EDIT: Sof'ella Food Company is now closed (as of April 1 2014, no joke)! They sold their products to American Naturals Company but as of yet (10/14) they have not put the pot de crème back into production. Sad day.

Pumpkin Spice Pot de Crème
(Box mix from Sof'ella)
Ingredients:
1 pkg. Sof'ella Pumpkin Spice Pot de Crème
2 Cups Whole Milk
Important Items:
Little Ramekins or Glass Cups
Directions:

1. Pour the pot de crème powder mix & the milk into a pot on medium-high heat. Whisk until the mixture thickens & comes to the very beginnings/whisperings of a boil. Reduce the heat & cook about 30 seconds more. Remove from heat.
2. Pour the mixture into little ramekins or glass cups & let sit on the counter until room temperature. Then place in the fridge for 1-2 hours to chill & solidify. Serve with whipped cream (recipe here) & nutmeg sprinkles on top!

 |
| (Pumpkin bowl w/ lid & bottled pumpkin soda from World Market) |

The Basics: Whipped Cream

Below you'll find an easy-peasy recipe for making your own lovely whipped cream as well as a recipe for whipped cream frosting!
Ingredients:
1 Cup Heavy Cream
2 Tbsp. Granulated Sugar OR Powdered Sugar
1 tsp. Flavoring (optional)
Directions:

1. Place a metal mixing bowl & whisk, or mixing whisk attachment, into the freezer for at least 10-15 mins. Remove from the freezer & pour the cream into the chilled bowl. Mix on med-high speed for about 3 mins. or until soft peaks form. Add the sugar & optional flavoring & mix on med-high for another 2 mins. or so until stiff peaks form — but watch that it doesn't get too thick or else you'll soon have butter (so this can also be a recipe for sweet butter, if you want)!
Whipped Cream Frosting
Ingredients:
3 Cups Heavy Whipping Cream
5 Tbsp. Granulated Sugar
1 tsp. Clear Vanilla Extract
2 (.35 oz.) pkgs. Whip it Stabilizer OR 3 large, melted marshmallows
Directions:
1. Place a large metal or glass mixing bowl into the freezer for about 30 mins. Retrieve the bowl & pour in all of the ingredients. Mix/whisk on high speed until stiff peaks form, about 5 mins or so.

October 11, 2013
Sizzle Crisps from "Avatar: The Last Airbender"
.jpg)
.jpg)
Fire Nation Sizzle Crisps
Ingredients:
1 pkg. Bacon (preferably center cut, normal thickness)
1/2 Cup White Granulated Sugar OR 3/4 Cup Brown Sugar
Ground Red Pepper Powder
(&/or other spice powder. I like the red pepper + McCormick's Grill Mates Fiery 5 Pepper Seasoning)
Directions:

1. Preheat oven to 300°F. Line a baking tray (with sides) with foil & place a wire rack onto the tray. Pour the sugar onto a large plate & spread it around & (if using brown sugar) fluff it with a fork. Open the bacon pack & cut all of the bacon in half. Using the fork or your hands, dredge each strip of bacon in the sugar (rub it on if using your hands, esp. good for brown sugar) & shake off any thick clumps. Lay the sugared strips on the wire rack & slide the tray into the preheated oven. Bake for about 15 mins & then carefully flip the strips over & bake for about 15 mins. more or until the bacon is nice & crisp-ish & no longer pink (oven times vary & bacon brands vary too, so keep an eye on it! Don't let the bacon burn!).
2. Remove the tray & let cool about 5 or so mins. The bacon will stiffen a little as it cools. Stack one row of strips together & transfer to a plate or cutting board. Cut into bite-sized pieces & then separate the pieces from one another. Repeat with the remaining bacon strips. Put all of the pieces in a plastic sandwich baggie & sprinkle in some red pepper powder &/or any other spice you'd like. Do this to taste, of course (I suggest adding powder in small amounts)! Seal the baggie & shake to coat the bacon pieces. Serve the spiced bacon pieces in red cupcake liners (this is great if you're having a party or something). If you don't want to cut the bacon into little pieces, simply sprinkle-spice both sides of the uncut bacon strips while they're still on the wire rack. Enjoy!
.jpg)
.jpg)
.jpg)
October 7, 2013
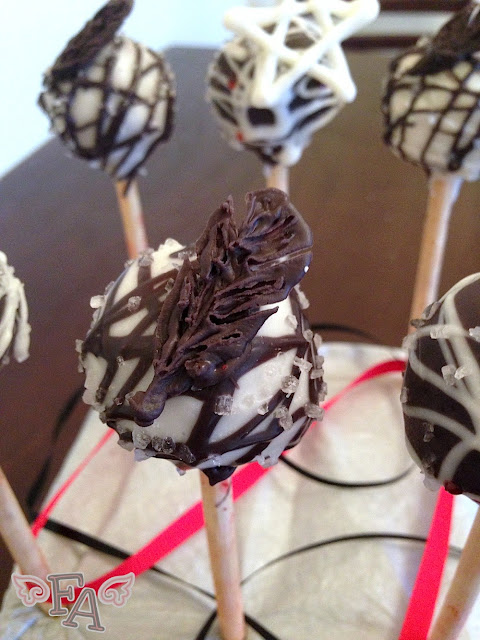
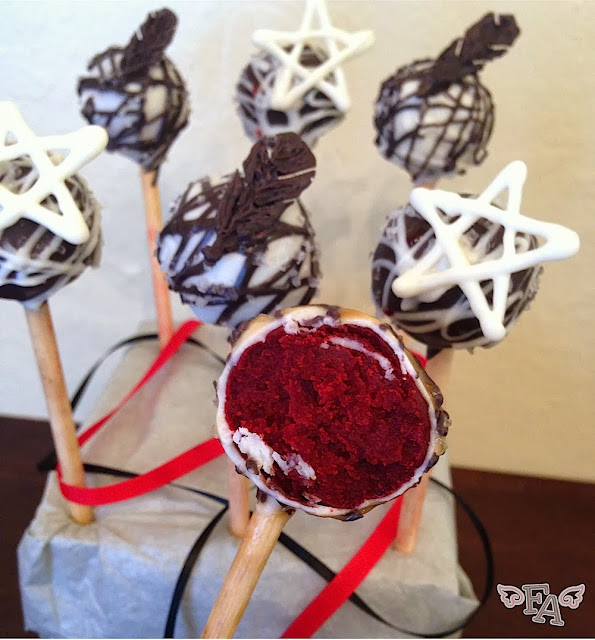
"Supernatural" Cake Pops
.jpg)
Supernatural Cake Pops
.jpg) Ingredients:
Ingredients:Cake Pops made with Red Velvet Cake (recipe here)
White Candy Melts OR White Chocolate
Black Candy Melts
Canola Oil
Course Sea Salt
Important Items:
Cake Pop/Lollipop Sticks (wooden ones if you can find them)
Toothpicks
2 Candy Decorating Bags or Candy Squeeze Bottles (optional)
Parchment or Wax Paper
Styrofoam block or something else to hold the cake pops upright while they dry.
Directions:
.jpg) 1. Make your red velvet cake pops using whichever method you'd like (cake cop maker, crumbled cake + cream cheese or frosting, etc.) & chill in the freezer for a few mins. to solidify. Remember when inserting the sticks to do so with a little dab of melted chocolate at the ends so the sticks stay stuck in the pops. Heat the white chocolate in a microwaveable bowl at 30 second intervals, stirring after each time, until completely melted. Add in a small amount of oil & stir to make the chocolate thinner & more dip-able. Dip half of the pops in white, tapping your wrist gently while holding the pop over the bowl so the excess chocolate falls off. Stick the coated pops upright in the styrofoam. Now repeat the melting & dipping process with the black melts for the other half of the cake pops.
1. Make your red velvet cake pops using whichever method you'd like (cake cop maker, crumbled cake + cream cheese or frosting, etc.) & chill in the freezer for a few mins. to solidify. Remember when inserting the sticks to do so with a little dab of melted chocolate at the ends so the sticks stay stuck in the pops. Heat the white chocolate in a microwaveable bowl at 30 second intervals, stirring after each time, until completely melted. Add in a small amount of oil & stir to make the chocolate thinner & more dip-able. Dip half of the pops in white, tapping your wrist gently while holding the pop over the bowl so the excess chocolate falls off. Stick the coated pops upright in the styrofoam. Now repeat the melting & dipping process with the black melts for the other half of the cake pops.2. Put the rest of the melted white chocolate into a candy piping bag or squeeze bottle, or simply use a spoon for this step, & zig-zag drizzle white chocolate over the black pops. Do the same thing for the melted black & drizzle it over the white pops. Sprinkle course ground sea salt onto all of the pops & let the pops harden.
.jpg) |
.jpg) |
4. Once the stars & feathers have hardened, carefully release them from the paper by reaching your hand underneath & pushing up on the shapes while pulling away the paper. Affix the stars to the black pops & the feathers to the white pops using tiny dabs of melted chocolate (reheat the chocolate if needed, 30 secs. in the microwave). You'll need to hold the stars & feathers in place while the chocolate hardens, but be careful not to melt the shapes with the heat from your hands! You can do this step while the pops are upright, but laying them down is easier as it requires less holding in place against gravity.
.jpg)
.jpg)
.jpg)
Subscribe to:
Posts (Atom)